42 Courses
  60 Downloadable Resources
  406 Canva Templates
 Back to: Lesson Collection 1 FB
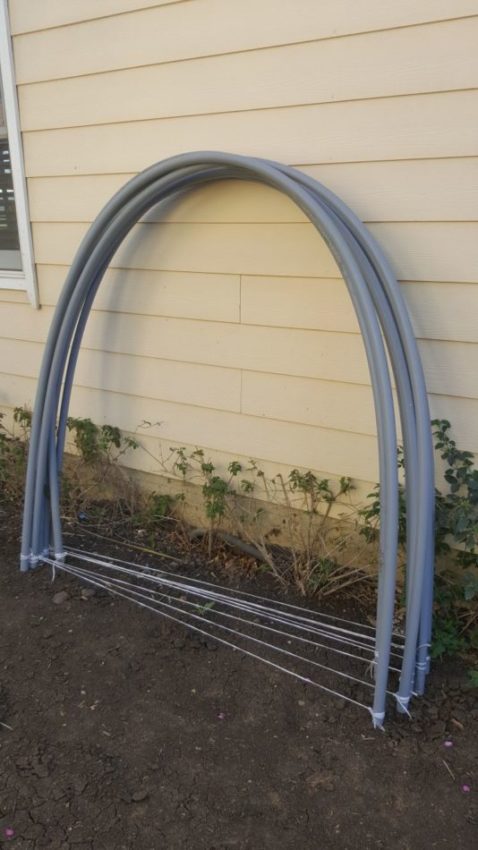
Arch frame
How to build the framing?
Intro – in this video we will show you what framing we use for the creation of the arch
We will include all the details you need to know so that you can create this amazing design too.
Our philosophy is that its better to create a custom made solution that is professional and sturdy so you will need to work with a welder and not just buy something ready made. We know this approach is harder for people who are just starting their way in the Decor job. Don’t be discouraged – we will share with you everything you need to know to become a pro too with our designs.
Framing Inventory – Here are the actual things you need.
For the arch we are using two bases with polls. Everything here is custom made.
We chose the sizes in centimeters as we use the metric system. When translating this course to inches – some of the measurements look odd. Don’t sweat about it. You can round it up to something that makes sense to your welder.
The arch: The base of the polls is hollow iron poles, one inch in diameter, that is welded on a base from iron in this size: 11.811 by 11.811 inch (0.23622 inch in thickness).
The height of the pole is about 40 inches
Inside the hollow polls we put a plastic tube in the diameter of 1.57inch that is also hollow, in the length of 157.48 inches.
We put the plastic tube about 4 inches into the poles and connect them with clear tape (strong adhesive is better).
How to build the framing of the carriage?
The base of the carriage: There are four bases made out of iron -, 9.8in by 9.8 in. 0.157 inch thick
Each base has a hollow iron “hoze” that is 23.5 inches in height.
This hoze has a screw inside the top section that allows to later screw in the next bit.
We use a square shape pipeline for the hoze (0.78 inch by 0.78 inch) that is welded in a 75 degree angle.
The body of the carriage is made out of iron as well that is thick but still bendable (0.23 inch).
We use 4 parts, each one is 94.4 inches long.
It has a bend at the middle.
We connect the four bended poles with an additional piece of roundish iron that is welded with screws so that you can connect the poll to it.
For the wheels we use think aluminum to create a size that is of a circle 27.5 inch in diameter.
To store it we do this: room / house: storage is in a special storage room inside my home. The PVC pole and bases are kept in that room. This protects the materials from climate and rain. Picture will be added here.
When we transport these we put them here in the car: We load the frame to the car in parts: the base and polls lie down inside the mini van car. The pvc pole that is tied to create the angle, is tied again on top of the roof of the car. We use a strong construction sites level of string (in terms of strength) to hold the pvc pole and to secure it to the roof of the car. The string is being taken of from the pvc pole only after I put the bended pole in the base poles in the event. (the balloons are sometimes prepared in bags including the babies, and sometimes its in the event location. The recommendation is to have everything ready in advance and just connect the balloons and position them). Putting the balloons on the pole or base polls is only done in the event location. Balloons in bags are protected from oxidation too.
Lets take a closer look at each part of the framing.
Connecting it together is done this way (usually we do this ONLY at the event location, so we arrive 25-70 amount of minutes in advance).
I can connect the entire arch in 25 minutes if everything is pre-made. If I need to make it all – I will target 70 minutes (but that’s after practicing the design for many years). We recommend that at the very least you draw the faces in advance. In the last 5 years I always made the babies in advance and made one spare baby.
The extra baby is also giving you added value (I will always create a basket or connect it to a hat) so this is how I over deliver and sleep better at night.
Strike process: usually, the customer knows that I am getting the equipment back. Our bases are strong and are made forever. So the customer knows I need to take it back. Some customers want me to actually dis-assemble the arch balloons and make topiaries from them and hand them over. If the customers don’t want me to dis-assemble the arch, I wait for the end of the event, I take it into a bag and pop the balloons directly INTO a transport bag. We almost always either stay at the event or send an employee. I really believe that these specific designs frames are too important to leave it for a day or two in the location, so 99.99% of the time we pick it up.
Strike fees are usually embedded into the overall cost (Nir also provide superb twisting services so has a justification to stay quite often).
During the event, I work… I call customers, I go through my facebook and calculate this into my pricing. To be honest – as the years go by that extra time to get back to customers is a blessing as we have a lot of inquiries and a backlog of admin work. This wasn’t always the case, but it is now so we cherish that wait time.
More questions and answers we had from our beta team:
Where can I get all these made?
We used a welder and we recommend you find one (either find one online in your area, or call a fellow balloon artist decorator and ask him for his welder).
Nir: choosing a welder is not hard (any welder can do this) but I don’t allow the welder to decide for me. I need the base to be invisible! so I prefer a big base that looks nice and is smooth and nice looking.
We recommend you use the sizing mentioned above, or bigger, but not smaller. The problem is that if you use a too big a base the weight is too hard to lift and transport is harder too. The bases are always being treated to smooth the base from sharp edges and I always color them by myself with a paint that is suitable for metal. The welder has to know this is for balloons.
The polls we use are colored white because we use them on the stork or carriage. Some polls are not colored in advance but we will use a 350 or 646 balloon to wrap around the poll. In this course, we needed white polls for the stork and carriage. For the arch we like the gray color, but if you want to use something else please do.
Can we get anything here ready made somewhere?
You need to go to a welder.
How much did it cost you to build this: Nir can estimate how much he paid for the arch so you have a point of reference. It’s about $12-16 per pole and base. The PVC pole is about $7 per 4 meters. When you buy many the price goes down.
For how long will it serve my business: This can last for SOOOO long. I save a lot by using the same bases and poles for years.
Can you use the framing for anything else? do you?
Nir: Yes! we will add pictures of the clown frames.
How do you handle deposit?
Nir: We have a lot of trust in our market and our customers always have a signed contract (and they even compensate us if they cancel) but we do NOT take a deposit. In our market, we just don’t need the deposit. No one ever tried to not pay us so we are happy with the pre-signature of a contract as a way to secure our needs.
Do you take setup and strike fees? how much?
Nir: its included in the overal pricing.
What rounded up sizes should we use? – you need to decide because we used centimeters and you will maybe use inches. Just go one more to round up as bigger is OK, just not smaller (-;